Tuesday, June 21, 2011

Lemon Yellow Squash Pie

Need to get rid of your squash?

This recipe was featured in The Salisbury Post by Sue Davis about 3 years ago.  It was an instant smash with my husband and family.  (Unfortunately, the joke was on my uncle who hates squash and whom I tricked into eating and loving in front of everyone - Sorry Uncle Gray.) It fits perfectly into the Suburban Challenge because it is simple and freezes easily.  I made four.  I took one to a Father's Day get together last weekend and have frozen the other three for the next time I am "asked" to bring a dessert.

1 cup yellow squash grated in food processor
1 cup sugar
3 tablespoons all purpose flour
2 eggs
1/4 cup melted butter
2 teaspoons lemon juice
1 pie shell (I used the graham cracker ones)


Preheat oven to 350 degrees. Grate squash. Mix all ingredients together and put mixture into pie shell. Bake for 45 minutes on the oven's lowest rack.
I was only able to cook 2 at one time since that is all that would fit on my lowest rack.
My freezer is starting to look good!  You can see the three extra pies in the back, zucchini bread in the front, and a bag of muffins ready for next month.

Friday, June 17, 2011

Canning 101

I can my own fruit jams and my own vegetables - big deal! I get a lot of weird looks when I tell people that, like their thinking, "That is so old school,"  or "I would never have the time or the patience for that,"  or even, "I'm scared to do that."

I got into gardening three years ago inspired by my grandparents' successes. Realizing how much more I could do if I could preserve some of this food to last longer than the three weeks its harvest is fresh, two years ago I bought Canning & Preserving for Dummies, Karen Ward. Literally, canning for dummies because I didn't have the slightest clue how to can food.  Thoughts of botulism and salmonella danced in my head as I dreamed of creating cute little Christmas presents for the secretaries at work. However, I rationalized to myself that canning has been a survival skill for over 100 years. If farmers could do it in the 1800s without a class - so could I. Thus, I set out on a journey to self-educate moi-meme about canning.


I quickly learned that there were two types of canning: water bath and pressure.  After reading the chapter about pressure canning, I decided that I was going to start off small and just focus on water bath canning. Water bath canning is placing the jar into boiling water to seal the jar. Simple - yes. The canners with racks can be purchased at Walmart for $30-40. With this process, you can preserve anything that has acid - fruit, salsa, pickles, tomatoes, and relishes.  This was a great way to start small.  I had so much fun that first year that last year I decided to take the plunge and begin pressure canning as well. This canner is a bit more expensive than the water bath and much more technical $70-85.

Now, my sister-in-law who has an exploding garden wants to also preserve some of her cucumbers with pickling recipes.  I am walking her through the very easy process. I think that America is having a renewed interest in learning the art of canning - proof is in the canning aisle at Walmart. It is fun, safe, and even easier with today's modern-day techniques. Here are some tips:
1. My biggest piece of advice is - Don't buy a canner if you know someone who has one.  Borrow It!!!  Why add another piece of equipment to the house if you don't have to. If there are of two of you in a circle of friends who want to start canning but don't know of anyone who has a canner, split the cost and share it. You only use it for about four-five times in a harvest.
2. Think of all of the cute, cheap Christmas gifts you can start creating.  Make cute little labels that say "From the Kitchen of Jane Doe 2011," and you have got yourself the best teacher, secretary, neighbor, step aunt, mailman, preacher, hair dresser, or swim coach gift ever.
I so don't have room in my kitchen for all of the extra cans, so I found room in my front living room to store them.  Magazine, picture frame, candle, ...... green beans?

Tuesday, June 14, 2011

Healthful Squash Breakfast Muffin

Similar to my issue with Zucchini, all of my yellow squash wants to harvest at the same time. And, as with zucchini, there are wonderful ways to eat it fresh.  My favorite is grilled with a little balsamic vinegar and olive oil - or the casserole Kimberly made on memorial day from Southern Living.  (It had BACON!)

I set out on a mission to create a healthier breakfast muffin involving the yellow squash. I researched other healthy breakfast muffins as well as squash dishes to maximize the yellow boy's flavor. It took me three attempts - but I nailed it! (At least I think it is good for having no white sugar or oil.) Enjoy!

Healthful Squash Breakfast Muffin
1 medium yellow squash grated
1 egg
1/2 cup applesauce
1/4 cup non fat vanilla or plain yogurt
2 tablespoons honey
1/2 cup brown sugar
the juice and zest from one lemon
1 1/4 cups all purpose flour
1 cup old fashioned oats
1 tablespoon flax seed
1 tablespoon wheat germ
1 teaspoon baking powder
1/2 teaspoon baking soda
1 teaspoon poppy seeds.

Preheat oven to 400 degrees.  Mix together the egg, applesauce, yogurt, honey, brown sugar, lemon zest, and lemon juice.  Add the grated squash. In a separate bowl, combine the flour, oats, flax seed, wheat germ, baking powder, baking soda, and poppy seeds. Stir in the applesauce mixture into the flour mixture. The mix will be lumpy. Pour batter into a greased muffin pan or liners. Bake for 20-25 minutes until the top edges start to brown. Makes 12 muffins. Can be frozen.

Monday, June 13, 2011

Reader Recipes

Some of you have sent me your awesome recipes in response to my previous posts.

Maureen, my dear friend in Richmond, VA and former roommate, sent me her breakfast casserole recipe. This recipe, similar to "Clean the fridge out Frittata" is flexible enough to use with whatever you currently have in the fridge that is getting ready to go bad:

"So I have been making this breakfast casserole for the last month and I thought you might like it for your blog. Which by the way love it.   I started doing it to make things easier during the week when it came to packing lunches so I didn't have to think about what I was going to eat for breakfast.  It's easy and I can heat it up in the microwave at work. 
 
Egg casserole: 
choice of meat
choice of veggies
8-10 eggs beaten
cheese (if desired)
 
Cook the meat (bacon and/or sausage). Once cooked, place in casserole dish crumbled.  Saute veggies (this week was left over peppers that weren't used in salads, onions and mushrooms). Once soft place in dish, then pour eggs and cheese if using over the mixture and bake at 350 for 45-60 mins until firm.  Cool, cut into serving sizes and put in fridge.  It's quick easy and we eat it all week. One less thing I have to think about during the week... "
 
Here is Maureen and her daughter Liliana at the Kannapolis park when they visited in January.
 
My cousin Becky King just had a baby one week ago today and has still found time to email me her wonderful zucchini recipes:
 
"I have 2 zucchini recipes  that I wanted to share with you.
 
Zucchini strips:
Cut zucchini into strips
blanch it (boil for 5 minutes)
Place on baking sheet and drizzle with olive oil, then sprinkle parm cheese.  Can also add some garlic powder or salt.
Boil low till browned.
 
Zucchini casserole:
Cut zucchini into round pieces (like a cucumber slice)
In casserole dish add layer of zucchini, then place a spaghetti sauce (I use hunts) on top of the zucchini.  I think place a layer of mozzarella cheese. and repeat for another layer (zucchini, sauce, moz cheese). Bake on 350 for about 25-35 minutes."
Introducing the newest member of our family: Avery McCall King.  We love you already!!

Wednesday, June 8, 2011

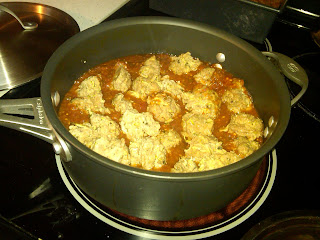
Summer Meatball

Sneaking in zucchini, this kid friendly recipe is also healthy.
It is easy to make all four batches at once so that you can prepare dinner and freeze three batches for later. For each batch of meatballs you will need:

1 pound of ground turkey
1 egg
2 tablespoons mayo
1/3  cup bread crumbs
1 tablespoons fresh chopped basil
1 teaspoon salt
1/2 teaspoon pepper
1 tablespoon balsamic vinegar
1 cup of grated zucchini (for all four batches you will need about 3 medium zucchini)

Preheat the oven to 350 degrees.
Mix all ingredients together.
Place a cooling rack on top of a rimmed cookie sheet. Form one inch meatballs and place them onto the cooling rack. This allows the grease to drip through the meatball and keep it crisp while baking.

Bake for 35-40 minutes until the tops are brown and hard.
Using a fork, lift the meatball off the cooling rack and place into a freezer safe container till ready to eat.

The meatballs will have cooked and formed to the rack and will leave lines. However, cooking them this way allows you to cook an entire batch at one time without using a lot of oil and smoking up the kitchen.

To serve: Thaw if frozen. Place meatballs into a large fry pan with a jar of marinara of your choice. Reheat over medium heat for 15 minutes or when sauce begins to bubble.  Serve over pasta.

Sunday, June 5, 2011

Zucchini

When it rains it pours!!


I love to plant zucchini every year.  It is easy to grow and produces a lot. However, its just my luck that it is all ready at one time.  There are tons of great recipes out there for eating zucchini fresh - however, it is a little more difficult to think in terms of The Suburban Challenge and making the zucchini last much longer. Here are three of my favorite ways of transfer zucchini from plant to freezer so that I can continue to enjoy it for months longer.


1. Zucchini Bread.  Make extra batches and freeze them for the holidays, house warming gifts, or when a friend has a new baby you can take over a breakfast dish for sleep deprived mom and dad.  I like hosting friends every year at Christmas for a holiday brunch. As with last year, I will already have one dish made and ready to thaw - the zucchini bread.  Paula Deen's recipe is my favorite:
http://www.foodnetwork.com/recipes/paula-deen/zucchini-bread-recipe/index.html

2.  Meatballs.  While grating the zucchini for the zucchini bread, I also grate some to incorporate into a summer meatball that freezes well.  Recipe to follow!

3. Baby Food.  Peal, steam, puree, then add liquid (breast milk, formula, or water) to create a creamy consistency.  Freeze in ice cube trays. Last week I made a vegetable blend of zucchini, broccoli, and green peas all from the garden. Cam loves it!

Friday, June 3, 2011

3 Ways to Save Money in June

Here are this months ways to save money:

1. Spoon yogurt into single-serve dishes. Everyday I pack a individual yogurt and applesauce in my lunch for work. I have done this for two years. I recently realized how much extra money I am spending that is not necessary. A carton of four yogurts at Aldi is $1.86. Or, the average individual yogurt is $.75.  However, if you buy the large, 2 lb container, it is $1.26.  Last week I purchased the large container and portioned the yogurt out into recycled baby food jars and got six servings out of my $1.26, and it took me less than five minutes. Well, this rule applies to my applesauce as well.  So, if my calculations are correct, and I continue buying the larger jars, I will have an extra $100 to spend at Christmas (as well as creating less waste for the environment).

2. Washing Lettuce. Too tired to rinse your own lettuce so you end up buying the pre-rinsed, chopped bag lettuce in the produce? The red leafy kind is $1.99 per pound if you bag it yourself and wash and chop at home, or $4.33 per pound if you toss a pre-washed bag in the cart. If you can wash a pound in five minutes, give yourself credit for making $30 per hour.

3. Peeling carrots. Baby carrots are cute, but at $2.65 a pound, they'd better be.  Peel regular carrots that cost 88 cents per pound in 5 minutes, and you made $53 per hour.