Sunday, September 8, 2013

It's Over!!!!

Lets recap: The goal was to create a better flowing family area with sight lines from the kitchen sink to where the children are playing at all times.  Working within the limits of a 1800 square foot house with no option of going up or out, reworking our given spaces was the key.  We shrinked the size of the TV area, got rid of an unused and separate dining room, took down two walls......and created one large open area with kitchen, dining, and living area.

The painting finished up on Labor Day and we were able to finally bring back all of the furniture and hang the curtains.  So....here are the before and after pictures!


Standing at the Garage Door BEFORE....

and AFTER.  The wall came completely down so the kitchen could be bigger.
 
Standing from the middle of the house (laundry area) looking out BEFORE:


AFTER: You can see right out and can tell which two walls came down to open the area.
 
The large living area BEFORE:
 
 
After: Now is split into TV and dinning areas open to kitchen.


One more angle from the living room BEFORE:

 and AFTER:
 
 
MY FAVORITE DETAILS.
Some of the little stuff is not as noticeable as two missing walls and a large L shaped island, but it is what makes this small house feel large and functional for a wild family.
No room for a home office, but with custom cabinetry we were able to design a wall unit adjacent to the bar at the same counter height.  So, just pull over a bar stool and work on the computer while cooking or watching the kids play.
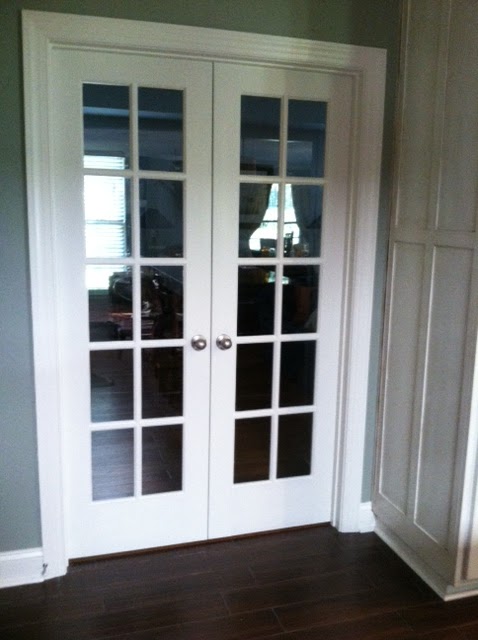
Before, there was a small door to enter the front living.  Opening it to a 48 inch French door lets in more light.  I plan on using the front formal living (that is never used) as a play area with train table, piano, and craft area.
No room for a mud room.  In fact our garage door opens right into the kitchen.  So, just steps away from the garage door I also designed a "mud closed" to house lunch boxes, shoes, coats, bags, broom, etc...  This was one of my strangest request to the cabinet man, but best ideas.  This is what makes custom cabinetry worth the extra money.  Much more expensive than stock cabinetry, but much less when you consider I was able to offset the need for two new rooms added on (home office and mud room) but working them into the cabinets.
I am so excited about having a new garage door that actually shuts when pulled!!! I found this vinyl sticker at the Dollar Tree.  This is the view from the garage.  Why not decorate the view from the garage that my family and I see 8 times a day? You can also have a little fun with this area since it is only seen by family members.  Maybe when I get around to it I'll recover the carpeted stairs up to it in a fun color and hand more hooks to the left for book bags.
Previously this was a single patio door.  I love my view out now with the double doors. From the sink I can see Camilla and Rex dumping potting soil all over the pavers.
 
BUDGET SAVING TIPS:
I sold many of the old materials on craigslist (old cabinets, old floor).
 
I was able to reuse my fridge, stove, and dishwasher.
 
I found porcelain tile for $1.98 a square foot that looks like wood.
 
Painted cabinets are more expensive than stained. So, I went half and half so I could afford my favorite - white cabinets.
 
Bought a floor model dinning room table for $199 and then found 6 chairs on Craigslist for $300.
 
Installed an expensive ceiling fan in the back living area ($150) with uplighting and downlighting to offset the need for new lighting above the dining area.  That would have gotten expensive and probably would have required some new wiring.
 
I got lucky at one of Queen City Appliance's sales.  We had budgeted $250 for a new faucet and found one for $75.  We had budgeted $250 for a new, basic microwave and found an upgraded model for $225.  We had budgeted $250-300 for a new stainless, undermount sink and found one for $100.  All in the same shopping trip to Queen City's warehouse in Charlotte.


Sunday, July 7, 2013

Canning Recipe: Gumbo Starter Makes 4 pints

3 Tablespoons Olive Oil
3 chopped onions
2 tablespoon minced garlic
small bunch of chopped parsley
2 diced green bell peppers
4 ribs of celery diced
1  quart water
1 tablespoon Tabasco
1 tablespoon each salt and pepper
1 tablespoon Worcestershire
1 quart of sliced okra or 3 lbs.
10 large tomatoes peeled, seeded and chopped

1.  In a large stock pot heat garlic in olive oil. Add chopped onions, celery, and pepper and saute for 10 minutes stirring often.
2.  Add water and bring to a boil.
3. Add seasonings, okra, and tomatoes.
4. Bring to a low boil and simmer for one hour uncovered.
5. Transfer to hot, sterilized jars. Process at 11 pounds pressure for 40 minutes.


To serve:
Make a Roux with 1/4 cup oil and 1/2 cup flour.  Add a pint of starter and bring to a boil (you can add1cup of water in you want a thinner Gumbo).  Add meat and boil until the meat is tender or fish is cooked. Remove from heat, add 1/2 teaspoon file and serve over hot rice. Serves 4-6.

Garden Picture of the Week

Out with the lettuces and in with the Sweet Potatoes!!


Friday, June 28, 2013

Two full weeks without a kitchen....

It has been a test of patience, no doubt.  Especially when there is no room for a one year-old to run around in.  But, it has been a week of the "unseeables."  The electric under the house, leveling ceilings, moving beams, framing doors, etc.....  Just waiting for the eye candy to start to arrive.


OH....and I have to can in the garage!  I was able to get 7 quarts of green beans and potatoes canned Wednesday evening.  (In the hot garage, with mosquitoes, and nothing but apps on my phone to keep me busy.)
 

Monday, June 17, 2013

Making Money during the Remodeling.

I told Steve the other night, I felt like we had a laceration and the money was just bleeding out!  Well, I have found a couple of ways to stop the bleeding and have brought a little money back home.

1. I sold our old flooring.  Rather than just tossing the old flooring in the dump, I had Steve lift it carefully about three weeks before the remodel actually began.  I boxed it up and took pictures of it still in the room and then boxed up in the garage ready to walk off. I was able to sale it on Craigslist for $100. It was a total of 310 square feet of parquet wood flooring.

2. I had some furniture that is no longer going to fit into the new floor plan.  I sold my breakfast table and 5 chairs for $125 and my computer armoire for $90.

3. My cabinets were in great shape, I just though the color was a little dated.  Also, they were not going to be reusable in the new layout. I sold them to my painter for an $800 credit of painting.
4. The counter tops normally just go in the trash.  But, a friend from work is building a studio apartment on his parents property for he and his new fiance to move into while they save money for a house.  I traded the use of a counter top microwave to use during the remodel and some fresh organic eggs from his dad's farm for the old counters.
5.  I found a warehouse sale in Charlotte two months ago and scored on my appliances.  I bought our over the range microwave for $225(compared to the $400s), an under mount stainless sink for $100 (compared to about $275), and a stainless faucet to match for $75 (compared to $250).  All brand new Kitchen Aid that had been used in their show room. 

6.  The new floor tile was the biggest headache.  Everything I was pricing out was at least $3.00 a square foot.  The stuff I dreamed about was $5.00 a square foot.  I tried looking on Craigslist but could not find enough.  We needed 720 square feet for the new space.  Lowes got in a new shipment of designer tile that was in stock (not special order).  I really liked one that was $2.48.  Since we needed so much, we asked for the manager and were able to negotiate a pallet price of $1.90 a square foot.  I am so excited and its beautiful.  It is the new style of porcelain that is made to look like hardwood.  Stay tuned for the installed picture!!


Wednesday, June 12, 2013

The Kitchen Project

Well.....HERE WE GO!
I'll try to post weekly pictures of the kitchen transformation.
The goal: To update the early 90's kitchen while creating a better flow from the back of the house and better site lines into the living room where the kids are always playing.
 
Before: The view from the garage door.


Week One
 
Week Three....same view.  The oven is now in the garage and the fridge is in the front living room.  Good Times!!
 
 
Before: The view from the fridge.  This is the site line I'm trying to improve.
 
Week One...you can kinda see the fireplace start to peak through.
 
                 
Before: The view from the living room into the kitchen.
 
Week Three...it is all gone.  But, what a large playroom the kids now have!
 
Week Three from the fireplace looking back.


Thursday, May 30, 2013

Garden Pic of the Week


Staking the Tomatoes.  
Thanks Dad for suggesting to use newspaper covers to tie up the tomato vine. They are easy to tie and stretch a little.  Also the plastic doesn't bruise the branch.  
Camilla also found a big green tomato.

Sunday, May 12, 2013

The Suburban Challenge's Journey of a $5.86 Whole Chicken

Who has time to make chicken stock from scratch and who doesn't love fresh chicken salad this time of the year?  Well, if I had time to do all of that, this would not be called The Suburban Challenge.  In true fashion....I'm too busy for any of that.  So here is how I did it anyway with a whole, raw chicken from Aldi purchased for $5.86.  (I forgot to look at the pounds, sorry.)

1. I bought a whole chicken Friday afternoon during my weekly (and only once a week) trip to the grocery store. Saturday morning while Camilla (who woke up at 5AM) watched cartoons and Rex was still sleeping I cut the legs and wings off, ripped some of the skin off by hand, and sprinkled the meat with salt and pepper.

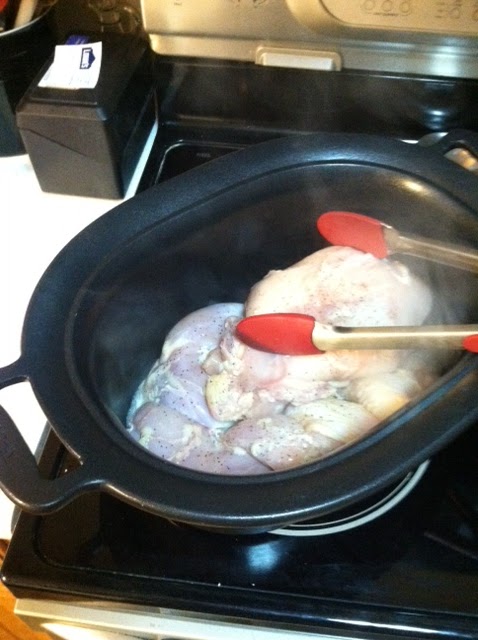
2. Then, I browned the meat on the stove top on all sides (about 8 minutes each side on medium high).  The Al Clad slow cooker in the picture is my favorite cooking appliance. The slow cooker insert can go on the stove top for browning the meat preventing having to use and dirty two pots. Also, the slow cooker is programmable. I can set it for 8 hours and it will automatically go to a warm setting once done. This is a great feature since I don't know when I'll be home tonight from a Mother's Day party at Aunt Cathy's.


3. I placed the insert back into the slow cooker and set on low for 8 hours.

4. Packed the kids up and drove to Hickory for the day.


5. Once I got home the slow cooker had been on low for 2 hours.  I turned it off so that it would start cooling.

6. I then fed Rex and Camilla dinner and got them ready for baths and bed.

7. Once everyone was asleep, I separated the meat from the bones.  This was so easy that I was afraid bones were sneaking into the meat.  It took me less than five minutes. I placed the meat into a bowl for salad and the bones into a stock pot for boiling.


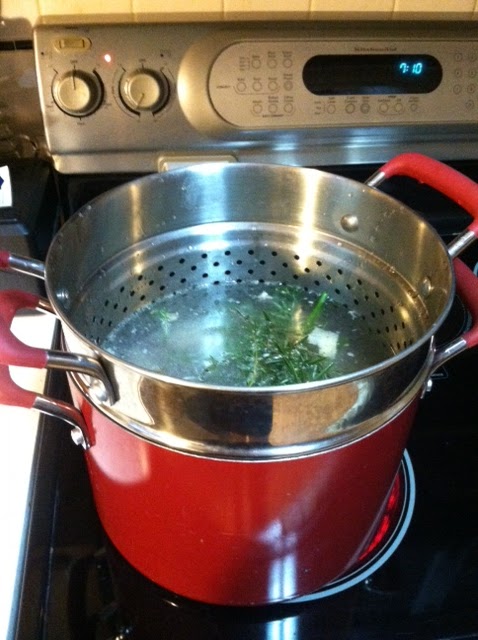
8. To the bones I added about 8 cups of water and herbs off my patio (Rosemary, Thyme, and Chives) and brought it to a boil. I find it easiest to use my stock pot that has a steamer insert because after boiling, all I have to do is pull out the insert and the mix is already separated. Bring to a boil and then simmer for 1 hour.  Completely cool before freezing.


9. Meanwhile, in a food processor, for each 2 cups of chicken add 1/4  cup of your favorite pickle and pulse 15 times.  Pack it into containers and freeze.  Add the mayo (and mustard) once it is thawed and ready to eat.

10.I then package cooled broth in 2 cup containers measured out.  Most soup recipes call for either 2,4,6, or 8 cups of broth. This way you know how much to easily thaw.


Total Summary: Cost $5.86. 
Yield: 2 pints of chicken salad valued at $10 and 8 cups of Chicken Broth valued at $8-10 dollars.  So, being gone all day, I still managed to profit about $12-$15.

Wednesday, May 8, 2013

A Weekend Makeover


            Before                                                                        After

I removed the brass doors all together.  We don't need them with our new gas logs.
I spray painted the brass vents with Rustoleum "Oil Rubbed Bronze"
I primed the brick and
painted the brick "Turkish Coffee" from Sherwin Williams
Then I painted the mantle "Dover White" from Sherwin Williams and then distressed it with coarse sandpaper.


Thursday, May 2, 2013

Garden Picture of the Week

Earth Box - $25
Potting Soil - $20
2 Zucchini, 2 Cucumber, 2 Squash, and 1 Packet of Green Beans - $15
Growing fresh vegetables on the patio of your urban townhouse.....Priceless

This is my good friend Deanna and little Cato on their back patio in Charlotte.  Despite having no yard, we still put together a vegetable garden.  There is even a tomato plant in the pot by the step.

Saturday, April 20, 2013

Garden Picture of the Week

Nothing better than a dirty Tarheel hard at work tearing down daddy's brick border!

Planting Strawberries

Last year we bought 8 strawberry plants and placed them in the back yard around a dogwood.  Nothing happened!  So, this year I decided to move them to an area that gets full sun.  Strawberries are a perennial (they come back every year) and they spread (they multiply).  So, with the new beds I built in the backyard, I wanted to make sure the berries received a spot that would be undisturbed each year.  I also wanted to make sure that I gave them enough room to spread.

I build a raised bed out of found cinder blocks that were "free" on Craigslist.
 
I relocated my berries....we shall see how they grow!
Strawberries require no maintance (other than keeping the birds away). If you are relocateding them, as I was, move in the early Spring or mid Fall.


 They are in and ready to grow.  I have metal pie plates hanging to try and keep the birds away.  My Pawpaw Rex use to do this.  We'll see if I can have his same luck.

Strawberries can really grown in about any container.  Here are some more ideas:
tower1
Strawberry B
 
Want some recipe ideas?  Check out this blog post on canning strawberry preserves and freezing strawberry pie filling:
 

Tuesday, April 16, 2013

Our Little Cookie Monster Turned ONE!

Rex turned a year-old March 30th.  To celebrate we had a "Cookies and Milk Party." Sounds cute, right?  Well, to be honest, the second child always gets a little less 'frill' than the first.  I am so busy with work, and juggling two kids, that when I saw this idea for cookies and milk....THAT WAS IT.  Anyone can handle planning and organizing cookies and milk.  It actually turned out to be wonderful.  There was no stress because of an elaborate menu. We had some close friends and family members over, the kids played in the backyard for about 30 minutes, we let Rex open his gifts, we gave him his cupcake, and then we all just sat around the backyard and played for another thirty minutes and ACTUALLY enjoyed each other's company.  Imagine that! A party where you actually get to enjoy your guest.  Highly recommended.

Sugar Cookies: These sandwich cookies are actually part of a box set sold at Williams Sonoma.  The top cookie has the mouth cut out.  I layered white icing in the middle, did the eyes, and then colored the rest of the icing for the face and for the cupcakes.  I used chocolate chips for the eyes rather than piping more icing.

Blue plates from the dollar store that I glued two white circles to the top.  Then took a sharpie to them.  The cute spatulas were also a find at Williams Sonoma.  I am aware that you don't need a spatula to pick-up an Oreo, but it was an easy extra decoration since I already purchased them. The fancy cookies were used as favors, and all I served at the party was Oreos and cupcakes.

12 cupcakes.  I made 6 plain with a Cookie Monster topper (also a Williams Sonoma find) and then I decorated 6 with 1/2 an Oreo for the mouth and a marshmellow cut in two.  I placed baby pictures of Rex on the table for guest to look at.  Another easy decoration.  Rex got a Cookie Monster for his birthday...it made a perfect topper for the cupcake tower.

And of course.....matching t-shirts for the guest of honor and his big sister.  I bought two t-shirts from Walmart and made the appliques for them.  To make the applique, I actually traced the large Cookie Monster spatula in the second picture, ironed them on, trimmed them, and then hot glued funny eyes.  They will be able to wear these all summer!

Saturday, March 30, 2013

Container Gardens....Anywhere..Any way!


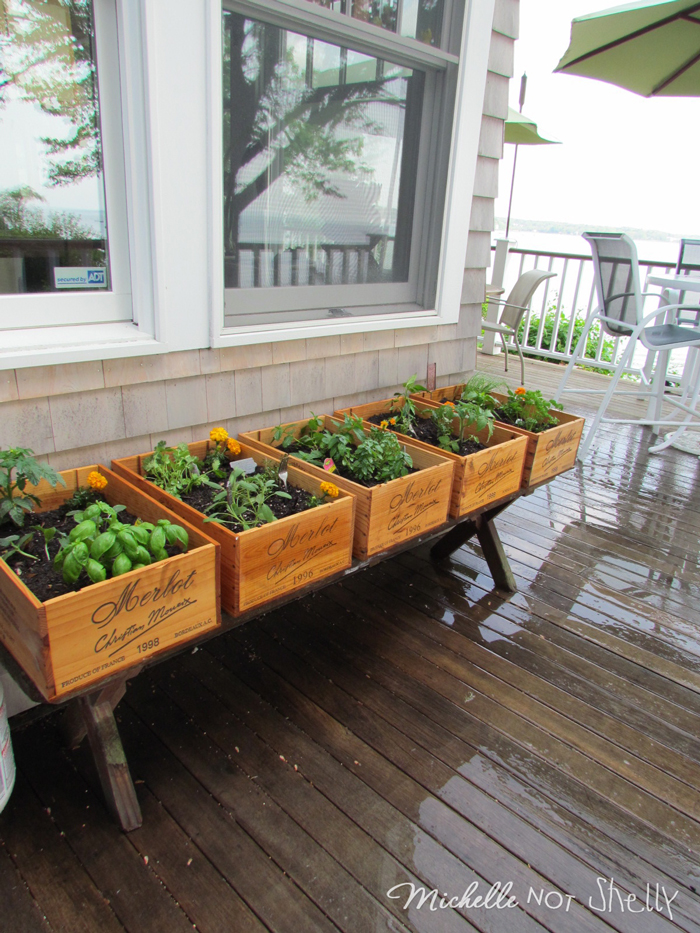
An Herb Garden in old crates, on a bench, on a porch.  Read the entire article:
http://blog.stitchawishdesigns.com/2011/06/our-lil-deck-garden/


Salad Greens make a great pot.  They only grow to about 6 inches tall, they are full of color, and can be planted close to each other without being over crowded.  Just cut leaves for a salad 1 1/2 inches above the soil and the greens will continue to grow all spring, summer, and fall.  Place pot in full sun during spring and fall and find a more shaded area during the summer so that they don't burn.


Integrate your fruit and veggie garden with an area of your yard where you hang out. When the crops are close at hand, you're much more likely to pluck off an insect pest or give a thirsty plant a drink.
 
I have Kale growing in a pot on the patio wall and all my herbs lining the wall. I walk out the door and snip fresh herbs.  The only thing you can see in this photo is the large rosemary bush in the background.


Friday, March 22, 2013

Raised Urban Gardens

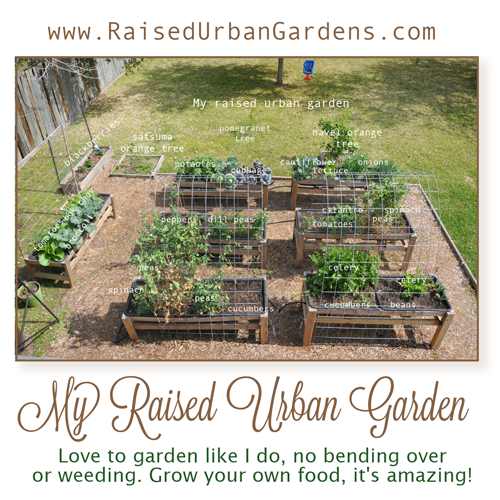
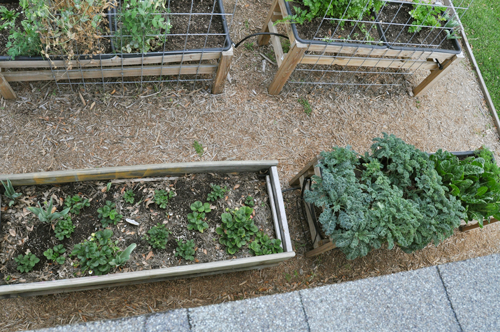
I found a new blogger to follow.  She has great articles and pictures of her garden all in raised beds!  Here are some of her pictures.  To read more :

I love how her garden is small and managable.  Similar to the garden I am trying to create.  I love these beds raised on legs.  How convienant it would be to plant and weed!!
 
I couldn't get two boxes into the picture, there were under the roof edge.  My brave daughter went on my roof for this picture - so missing is the converted picnic table of strawberries and the kale/swiss chard and carrots box.
I couldn’t get two boxes into the picture, there were under the roof edge. My brave daughter went on my roof for this picture – so missing is the converted picnic table of strawberries and the kale/swiss chard and carrots box.

these were hard to add in the big picture because they are under the eves of the roof.
these were hard to add in the big picture because they are under the eves of the

Monday, March 11, 2013

The Spring Garden

The garden is finally planted.  After a cold and wet February, we finally got a pretty weekend when we could till the ground and put plants in the ground.  I hope it is not too late for my broccoli, because I planted a lot of it.  I only used two 8x8 boxes.  I put two fresh bags of top soil on each box with fertilizer to maximize the growing space. 
I was able to fit:
12 broccoli
6 Cabbage
6 Red Lettuce
6 Romain
9 Spinach
6 Cauliflower
12 Onions
30 Potatoes
4 Kale
6 Brussel Sprouts


Yeah! I crammed all of that into two 8x8 boxes.  The trick, lots of lose soil so that roots run deep rather than wide.  I also put the plants that I don't need to touch until the whole plant is harvested in the middle (head cabbage and cauliflower). And....then there is the potato discussion.  I had seen lots of different ideas for planting white potatoes on Pintrest.  So, my idea..... I cut five holes directly into a bag of top soil and planted five potatoes.  My hope is that inside the bag, the potatoes will grow and the vines will just grow out the top of the bag and spread  If this works, anyone will be able to plant white potatoes, even on a driveway.  I'll keep you updated.  When we are ready to pull them, we should just be able to open the bag and pull out at least 15 potatoes in each bag.