Wednesday, July 18, 2012

My Garden Makeover

Five years ago, Steve and I bought a fixer-upper in the heart of downtown Kannapolis because of its wonderful location and lot. I remember telling Steve that, "I can fix an ugly interior, but I can't fix a neighborhood or the lot." Thus, we settled on our ranch 'fixer-upper' with an awesome back lot!

This back lot was large enough for us to plant three apple trees, create a 40 X 40 garden, and still have a lot of open green space for future soccer games or baseball diamonds.

Currently, our garden is organized into long rows about two feet wide with about two feet between each row.  The area between the rows never stays clean and by the end of each summer, it is so full of weeds and grass that it is hard to walk through.

I recently read a new book which has inspired me to redesign my garden. The best part about this makeover is that by re-purposing junk I have found from previous owners, and items I have collected from my grand-parents' yards, this project will only cost = elbow grease!

The Complete Kitchen Garden: An Inspired Collection of Garden Designs and 100 Seasonal RecipesThe Complete Kitchen Garden by Ellen Ecker Ogden is the book I purchased for guidance. I found a used copy online for $4.00, but it is also available at Williams Sonoma.

Last week, with the help of my sister in-law Leslie, I measured out the garden and marked it off with landscaper's paint.

I marked off six 8 X 8 boxes with two feet rows on the exterior and four feet of walk paths between all the areas.

I cleaned out the first 8 X 8 box this week because I need to go ahead and plant a second round of bush beans, and start my carrot and spinach seeds for the fall.

The challenge will be to keep the grass and weeds under control in the walking paths. I found this article on Pintrest and will try to start creating this fall:

The newspaper will prevent any grass and weed seeds from germinating, but unlike fabric, it will decompose after about 18 months. By that time, any grass and weed seeds that were present in the soil on planting will be dead.  It’s green, it’s cheaper than fabric, and when you decide to remove or redesign the bed later on, you will not have the headache you would with fabric.
"The newspaper will prevent any grass and weed seeds from germinating, but unlike fabric, it will decompose after about 18 months. By that time, any grass and weed seeds that were present in the soil on planting will be dead. It’s green, it’s cheaper than fabric, and when you decide to remove or redesign the bed later on, you will not have the headache you would with fabric."

In my new design, I have also allowed for a large open space in the middle where I hope to use my grand-parents' old picnic table.
Perhaps if I can actually keep the weeds down I'll actually want to eat in the garden.

I also have this set from my other grand-parents' house in South Carolina that would look nice in one of the four foot paths.

Finally, I am going to decorate and create an enchanting place to visit with crap I have found from previous owners.

I'm not quite sure what these were used for, but I found two corner fences.  Maybe the previous owner used them to stack their wood pile?
Underneath all of the poison ivy are a collection of cement pavers and bricks that would be perfect to add to the walking paths.  However, I am going to wait till the winter to grab them. I already got one bad case of poison ivy two weeks ago when I was moving the fencing in the previous picture. I don't want to go back to that!

I'll keep you posted as the fall progresses!
Bree


Friday, July 13, 2012

What is The Suburban Challenge?

The Suburban Challenge, for any new readers, is living up to and owning the idea of being a domestic diva while not being a stay-at-home diva. It is the handbook for all of us multi-taskers who want it all - career and domestic bliss.

The key to The Suburban Challenge, if you choose to accept it, is cooking in bulk. You must be willing to cook one time per week and get in 4-7 meals from your time in the kitchen. Rachel Ray preaches this, but cooks a lot of different entrees on one day using similar ingredients. I preach this by cooking the same entree times 4 or 7 and preserving it properly. Traditionally I have frozen these entrees. But lately, I have been able to embrace canning - both water bath and pressure canning.

In either case, you are providing a healthy, home cooked, fresh meal for your family every night of the week while also saving one hour of each day by not having to cook it. With that extra hour you are able to achieve domestic diva status by gardening, working-out, running errands, sewing, playing outside with the kids, crafting, ... whatever your heart's desire. People ask me all the time - "Bree how do you do it all?" Well, time management. Make the most of your cooking time on Sunday, then spend the rest of the week WITH THE TV OFF getting done what it is you seek to achieve. Peace!

Here is my first good reason to have more time....my soon to be two-year-old Camilla.  She was helping daddy wash my car last week in the 90 degree heat while insisting on wearing her winter hat.

Here is my second good reason to have more time....my three month old Rex.  He has fallen in love with his puppy dog that Aunt Beth gave him!

Thursday, July 5, 2012

The first beach trip with a baby....

     The first beach trip with a baby was awful!  I remember telling my cousin after the vacation, "It wasn't a vacation for me. It sucked. It is a whole new world now."
     This is not a "How To" article, but rather a reflection on how I went from having The Worst Ever beach vacation to The Best Ever beach vacation in a matter of one year. Last year, my oldest and only child at the time was 9 months old. I was naive, ill-prepared, and confused about vacationing with a baby. Our annual trip to the North Carolina coast included extended family in a large rented beach house for one full week. As the oldest grand-daughter of this motley crew, I was the first to introduce a baby into the dynamics. Our normal routine for the last ten years consisted of the men playing golf three mornings of the week while the women make their way slowly out the the water.
     For me: coffee - jog - coffee - shower - beach.
So, with the naive assumption that the routine would remain the same, I packed the jogging stroller. Here is how last year went:
6 AM - wake-up, feed, Steve off for Golf
7 AM - coffee
8 AM - Jog
9 AM - Feed and shower
10 AM -Beach for 2 hours
12 - Feed and try to put Camilla down for a nap, hang out at house by myself for three hours
3 PM -Feed and back to beach
5 PM - in for dinner

So, other than being exhausted, I was only seeing the beach for about 3-4 hours a day while my family bathed in the sun for approx. 6-7 hours.  I was heartbroken, stressed, lonely, and pissed. I ended up snapping at my husband, he got pissed also, and then pouted for a day. Last year = The Worst Ever beach vacation.

This year positioned itself to be more difficult. Now, Camilla is 22 months old and Rex is 3 months old. Double the trouble! I am not an expert, but I have just experienced The Best Ever beach week with my family. What works for me and a family who enjoys planting our derrieres in the sand all day long, avoids amusements, and cooks in each night may not work for others. As I mentioned, don't pin this article as "How to Vacation with Babies," but rather "What I didn't think about the first year...." OOPS.
My 4th of July Sparkler

1. Your life has changed, so change your normal routine. I was so glad to hear that Steve was not going to play golf this year. And, well, I didn't jog each morning. I just did my four minutes of Tabata instead (see the post "I Get It, I'm Overweight").
Rex and I hanging out while dinner was grilling.

2. Think about what schedule is best for the babies. The best time for Camilla and Rex to be in the hot sun is early day. Since we wake up at 6AM, we were on the beach by 8:30 and stayed till the hot part of the day, 12:30. Then, it was in for lunch and naps, avoiding the hottest part of the day.
Camilla's ready to go back to the beach with daddy for afternoon sun at 4:00.

3. If the family offers to help - Take it! My mom, who doesn't really enjoy being on the beach during the hottest part of the day, agreed to come up for lunch at 1:00 each day, after I had fed everyone and they were down for naps. This gave me an extra 2 hours of sun alone (priceless). Then I called it quits at 3:00 when mom would go back outside. If you don't have a family member to help, this is where you and your partner need to take turns to give each of you your own "alone time."
4. Praise your partner for their talents and preferences. I am really good at sitting in my beach chair and doing nothing for hours - so I was really good at "managing" the tent while Rex slept in the shade. Steve loves to wade in the water, sit in the sand, and get sand all up in his swim trunks. So, since a 22 month old also likes to do this I made sure to compliment Steve on his 'style.' I told him "thank you for playing with Cam. She is special to have a father who will get sand in his junk." And Steve told me on day 2, "Thanks for being a great mom." That was all I needed to hear.
Camilla and her chariot.

5. I nursed Rex on the beach. I don't know why I was so determined to feed Cam inside the beach house last summer. That modesty cost me two hours of 'sun time.' This year I just crawled under the tent and covered up with my super cute new beach cover up.
6.  Buy crap from the dollar store. Before we left for vacation I went and bought a bunch of cheap toys that could be thrown away at the end of each day. This way Camilla had something new and exciting coming out of mommy's beach bag to destroy.

7. It is a whole new ballgame - but it doesn't have to suck. Instead of telling a cousin after the vacation how bad it was, accept change before and prepare. It still can be a vacation for you. This year was for me! With a plan and an anticipation of how it would be - I was ready.

Friday, June 29, 2012

Canning Green Beans and Potatoes

The Perfect Casserole Starter:
Add Cream of Mushroom Soup and dried onions and create a killer Green Bean Casserole.
Add Cream of Chicken Soup, Cream of Mushroom Soup, and Corn to start a Chicken Pot Pie.
Add Whole Chicken Breast and Cream of Chicken Soup for a great baked casserole.

1. Peel white potatoes and cube into 1/2  inch pieces.  Snap beans.
2. Boil cubed potatoes for 2 minutes. Set aside.
3. Boil green beans for 5 minutes.
4. Pack into hot steralized quart jars mixed half beans and half potatoes.
5. Leave one inch headspace. Add 1/4 teaspoon salt and 1/4 teaspoon of lemon juice (optional) to each jar. Cover with boiling water.
6. Process quarts for 40 minutes at 11 pounds pressure.


Wednesday, June 13, 2012

Freezing the Zucchini

I took out the food processor and shredded EIGHT cups of fresh zucchini.

Knowing that my two best freezer recipes for Zucchini require shredded zucchini, I am maximizing my time washing dishes by shredding it all at the same time.

2 cups of Zucchini go in each batch of Paula Deen's recipe.  I am making two batches.  Here is what I posted last June about Zucchini Bread:

"Zucchini Bread.  Make extra batches and freeze them for the holidays, house warming gifts, or when a friend has a new baby you can take over a breakfast dish for sleep deprived mom and dad.  I like hosting friends every year at Christmas for a holiday brunch. As with last year, I will already have one dish made and ready to thaw - the zucchini bread.  Paula Deen's recipe is my favorite:"
http://www.foodnetwork.com/recipes/paula-deen/zucchini-bread-recipe/index.html

I have already taken one loaf to a friend who had knee replacement surgery yesterday and the other three are in the freezer. (One of which is on hold waiting for Baby Covington to arrive!!!! It is a proven fact that a slice of zucchini bread in the microwave with a little butter can help with the raging hormones post-natal.)


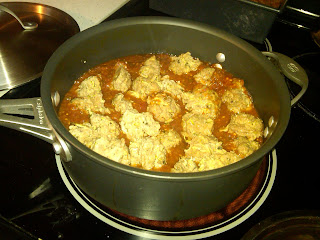
The other four cups of shredded zucchini will be used in my meatball recipe.  Cook them, freeze them, then serve with whole wheat spaghetti and sauce in the fall on a busy night!!  Success!


From This Blog:

Wednesday, June 8, 2011


Summer Meatball

Sneaking in zucchini, this kid friendly recipe is also healthy.
It is easy to make all four batches at once so that you can prepare dinner and freeze three batches for later. For each batch of meatballs you will need:

1 pound of ground turkey
1 egg
2 tablespoons mayo
1/3  cup bread crumbs
1 tablespoons fresh chopped basil
1 teaspoon salt
1/2 teaspoon pepper
1 tablespoon balsamic vinegar
1 cup of grated zucchini (for all four batches you will need about 3 medium zucchini)

Preheat the oven to 350 degrees.
Mix all ingredients together.
Place a cooling rack on top of a rimmed cookie sheet. Form one inch meatballs and place them onto the cooling rack. This allows the grease to drip through the meatball and keep it crisp while baking.

Bake for 35-40 minutes until the tops are brown and hard.
Using a fork, lift the meatball off the cooling rack and place into a freezer safe container till ready to eat.

The meatballs will have cooked and formed to the rack and will leave lines. However, cooking them this way allows you to cook an entire batch at one time without using a lot of oil and smoking up the kitchen.

To serve: Thaw if frozen. Place meatballs into a large fry pan with a jar of marinara of your choice. Reheat over medium heat for 15 minutes or when sauce begins to bubble.  Serve over pasta.


Tuesday, June 5, 2012

OK, I get it! I'm overweight!

     I'm not oblivious, I know the obvious truth, and I also realize that because of a recent pregnancy not only is it unavoidable, but the fat is also centered around my belly. But, do not ask me "When is the baby due!"  Sunday morning while at work at Williams Sonoma a long time customer approached me, patted me on the belly and said," Oh Boy! Another?" In that awkward moment I just smiled and replied, "Actually, I just had him...about a month ago."  In reality it has been two months, but I did not want to reveal how crushed I was by this comment.  Saying one month gave me a better excuse.
    I don't know if it is because this is number two, or if because I am almost 33, or because I am sleep deprived and still recovering from a mastitis infection - but the weight is not coming off!  I taught 3-4 aerobics classes a week during my entire pregnancy and returned to the gym after only four weeks hoping that the weight would just start falling off.  With my first pregnancy, I was down 15 pounds the day I got home from the hospital and down another 10 after the first two weeks. Not the case this time.  I was only down 8 pounds after the hospital and only down 5 more pounds the first week. Then, I did not lose a single pound for the next month.  On Rex's one month birthday I resolved to get more serious. Apparently I am actually going to have to work at this. :(
     As a fitness professional I have always stayed active and have been in shape.  I also have always eaten pretty healthy. Minus my love for sweets, I am a great eater. But, this is a new world with new parameters. Starting at one month:
  • I have to watch the sweets and carbs
  • In addition to the three-four workouts I'm already doing per week, I am embracing Tabata.
  • I am blogging about it so that I feel responsible for my results.  I feel like the world is watching and expecting to see results. Pressure! I need it. 
Tabata is a Japanese created workout plan where you exercise at a very high intensity for 20 secs. with a 10 sec. recovery for 8 repetitions.  This creates a 4 minute fat burning workout. After researching P90X and Intensity and learning that I can't afford to buy either program, they both incorporate this high intensity interval workout combing fat burning cardio with toning.  With all my experience and training, I'm smart enough to know how to do it and honest enough to admit I've never done it. Even in my cycling classes, although fun and challenging, I never get to the intensity that Tabata requires. I have seen many workouts "pinned" on Pintrest lauding a new 4 minute workout. That is not enough! I believe that these 4 minute workouts must be combined with an active lifestyle to see results.

My plan:
  • To incorporate at least one Tabata interval into each class I teach at the YMCA: spin, step and toning.
  • On days I don't teach, do a Tabata interval at home with Camilla as a "Dance Party" then take the stroller out or bikes out for family 'active' time.
  • Worst case scenario because I am to busy to do any workout at all... do a 4 minute Tabata interval before I jump into the shower.
Here are the results:
Starting at One Month Old:     176 pounds
Two Months Old:               170 Pounds
It is quite embarrassing to share these photos with you.....but perhaps it will provide the necessary motivation to stay the course.

Tuesday, May 29, 2012

In Season...

Last weekend, the white potatoes and onions came out, and the sweet potatoes went in! To preserve my potatoes and onions, I started out by making and freezing potato soup.  I'll also can some in "Chicken Pot Pie Starter" and work others into baby food.

I made a double batch of the soup below.  (I like this recipe because you don't have to peal the potatoes!)

Russet Potato and Green Onion Soup by Chris Carmichael in Fitness Cookbook
269 cal per serving, 26 carbs, 12g protein, 13g fat, 10g fiber

4 large russet potatoes, scrubbed and cut
1 small onion chopped
1 small garlic clove
1 teaspoon salt
1 cup milk
1/2 stick butter
1 bunch green onions
3 tablespoons grated Parmesan

1. Place a large saucepan with the potatoes, onions, garlic, and salt over high heat, boil, and reduce to a low boil for 20-25 minutes, or until potatoes are soft.
2. Add milk and bring to a boil.
3. Remove from the heat and add butter.
4. Let the soup cool.
5. Puree the soup.
6. Stir in green onions.
7. Sprinkle with Parmesan before serving.

Sunday, May 27, 2012

Oh! The Places You Will Go..

On Sunday March 27th, I opened my home to honor my senior CATS class.  This is a class in our schedule at school that meets everyday for 30 minutes to discuss character and academics. I was assigned this group as freshmen and now they are seniors.  We ate brats, asian cole slaw, chips, homemade pickles, fresh watermelon, and cupcakes.  It was only fitting that I read my favorite book to them, "Oh, The Places You Will Go." We played corn hole, and then they managed to get into a water gun fight with the mini-water guns I put into their favor bags.
Cupcakes were topped with a peanut butter cup, topped with a chocolate square to look like little graduation caps.  I took a blue icing pen and added the tassels.  Orange lilies and blue hydrangea made the centerpiece to represent our school colors.  Check out the rusty wheelbarrow in the back that served as our drink cooler. 
Corn hole and Ladder Golf in the background for play time.
Once they got their goodie bag: bubbles, a rubber ducky with a graduation cap, and a water gun....the war was on.  I actually had my camera up and ready to catch Luke sneaking around the house, through the front door, and out the back to surprise the girls from behind!

Saturday, May 26, 2012

Farmer's Market Saturday Morning

Why did I wait so long to make a trip with the kids to the Farmer's Market????

It was wonderful, fun, inspiring, beautiful, and sociable.  We had a great time, I got lots of ideas for recipes, and we saw about 8 different people we knew.  This Saturday, Camilla, Rex, my mom, and I loaded up the double stroller and headed to the Winecoff Road Farmer's Market in Cabarrus County.

http://www.piedmont-farmersmarket.com/the_winecoff_market-year_round

Saturday's 8-12.
I was most impressed by Valarie Wright who sells organic eggs that she raises in Enochville. She also sells them at the Kannapolis Farmer's Market on Thursdays.
And by T and D Farms out of Rowan County who raise Charolais cows ( a very high grade French cow) that are grass fed and hormone free.  They sell their beef, pork, and chicken cuts there every Saturday morning.


Camilla decided she needed to read up on cabbage.


Sunday, May 13, 2012

Whole Fryer Chickens On Sale!

Harris Teeter had whole fryer chickens on sale this week for $.77 per pound.  So, I thought, why not...


I bought two and roasted them Saturday morning.  I pulled the chicken and shredded it.
So for $8.53 total I was able to prepare.....

2 batches of Tostadas or Tacos (two cups each of shredded chicken)
3 pints of chicken salad (I put 2 cups in the food processor with celery and onion.  I'll add the Mayo once I'm ready to serve)
1.5 cups for a Hamburger Helper meal this week

Then I boiled the bones to make broth.  I was able to freeze 15 cups of chicken broth.  I froze it in 2 cup batches ready for soups.  I made my money back in the broth alone...not to mention the 6 other meals I have prepped and ready to go.


Tuesday, May 8, 2012

...I saw it on Pintrest....

I can't stay still.  Here are some of the things I made while on my maternity leave...
 Custom artwork for Camilla's Room..... Using a coupon from Hancock Fabrics I got the quilting loop for 7.99, had the leftover fabric, and then hit Hobby Lobby last week when their wood letters were 30% off.  I had the pink paint leftover from a previous project.  As she ages out of her nursery fabrics of green and yellow farm animals, I hope to redecorate her green bedroom with bold black and white patterns with accents of hot pint...hopefully a design that is cool enough for a sporty toddler. She can pass on the green and yellow animals to her little brothers room.
 I already had the grapevine wreath.  So, when I went to Hobby Lobby for the letters, I picked up an extra 'S' for 30% off.  I spray painted it with some leftover enamel paint I found in the garage and then hot glued it to the wreath. I have seen a ton of different wreath ideas on Pintrest.  So, my thinking is to start with this, then add seasonal decorations to the right side....Hydrangeas and Burlap roses are two ideas that I have pinned already that would work with this.
My new trash can wall.  I found the pallet in my neighborhood on the side of the road (I won't mention which house), used leftover exterior house paint, Steve stood it up with leftover rebar and brick, and then I bought the planter at Aldi.  So, total project cost = 6.99 planter at Aldi!
I love how it makes the trashcan and recycle bin an attractive focal point of the front yard rather than seeing the two cans flank the garage door.

Friday, May 4, 2012

4 Great Uses for Mint

Mint is a great herb that is easy to grow. However, it is so easy that it can quickly get out of control and take over your garden.  I wasn't sure if my mint would survive the winter, but it did and it came back with revenge. 

I need to trim it back before it takes over my rosemary and chives.  Here are the four ways I am going to use my cuttings......and use them to restock the freezer from the winter.

1. Herb Turkey Burger
http://www.marthastewart.com/318259/herbed-turkey-burgers
This recipe has great flavor but only makes four burgers.  So, I doubled the recipe to make eight.  Not only did I do that, in true Suburban Challenge fashion, I made four batches.  I cooked one batch that night and froze the other three.


2. Mint and Parsley Pesto
http://www.wholeliving.com/133273/mint-and-parsley-pesto?czone=eat-well/seasonal-foods/summer&center=136760&gallery=136700&slide=133276
What I love about this recipe and the next is that there is no cooking involved.  Throw all the ingredients into a food processor and then store until ready to use.  Shh...they are also both healthy.

3. Chicken Breast with Almond Mint Pesto
http://www.wholeliving.com/133181/rolled-chicken-breasts-almond-mint-pesto-and-zucchini?czone=eat-well/seasonal-foods/summer&center=136760&gallery=136700&slide=133182

I only made two batches of this.  One for Thursday night's dinner and one to freeze for later in the month.

4. Mojitos
Duh!


So, in summary, cut back your mint and enjoy.  If you are just now deciding what to put into your herb garden for the summer....go mint and enjoy these recipes later in the summer/fall.

Tuesday, May 1, 2012

Time to start a new....

So, the freezer was a great purchase and helped me survive all school year with only having to cook 1-2 nights a week.  Now that there is only six weeks till summer, time to thaw the freezer, give it a good cleaning, and prepare to start filling it again to prepare for next winter/school year. My goal during the summer when the fresh vegetables begin to flow is to preserve them in already prepared entrees (soups, burgers, meatballs, sauces, ...) Here we go again!

Sunday, March 11, 2012

Planning Spring Garden

Planning The Spring Garden 2012

The garden has been tilled and the plants are in! (To be honest, we are about two weeks late, but the rain got the best of us.)

Here is what I planned to feed a family of 4 through the middle of July having enough left over to freeze Broccoli Cheddar Soup, Potato Soup, and baby food to last the winter:
9 Broccoli Plants
6 Cauliflower
6 Green Cabbage
3 Red Cabbage
3 Bok Choy
3 Mixed Lettuce
3 Brussel Sprouts
1/2 pound red onions
1/2 pound yellow onions
5 pounds white potatoes

It took two rows and cost about $30.

Tuesday, January 31, 2012

Super Kale

Kale is not like other vegetables. Not only does it carry fiber and antioxidants, but also really good-for-you compounds known as glucosinolates.  When these glucosinolates brake down in the body, studies show that they may reduce the risk of certain cancers - lung, breast, prostate, and pancreatic.  Thus, Kale is known as a Super Food, along with broccoli, cabbage, bok choy, and brussels sprouts.  All of these Super Foods can be grown in Spring and Fall gardens.

I planted Kale in my fall garden last August, and since it is resilient to frost, in mid January it is still standing alone in the garden.  I took the picture above on January 29th and the leaves are still so very green.  If you live in North Carolina, or SC and GA, your planting times for Kale and its other Super Foods family will begin at the end of February.  

Cooking Kale: Although I will admit to its powers, I am not a fan of cooked Kale.  However, I have found a way to crisp it up with a little olive oil to cook a "Kale Chip."  Even my husband can't get enough of these.  For the past two Sundays, these Kale Chips have been a staple while watching the football games.  I will probably make a batch to take to our Super Bowl party next weekend and share the cancer fighting love.

Kale Chips:
1 bunch of fresh kale rinsed and dried
olive oil
sea salt
pepper (I actually used Old Bay instead of pepper because I like to taste of a Home Fry.)

1. Preheat oven to 325.
2. Tear Kale leaves off of the thick middle vein.
3. Toss lightly in olive oil.
4. Arrange on a cookie sheet so that leaves are barely overlapping. (I found that if they overlap too much the leaves on the bottom get soggy.)
5. Sprinkle with salt and pepper.
6. Roast in middle of oven for 25-30 minuets.
7. Transfer to a paper towel lined plate to absorb any extra oil.
8. Enjoy.  Very Easy!!

Sunday, January 29, 2012

Nesting

The problem: We live in a three bedroom house, but that third bedroom is a pine paneled office.  Very Dark! For a while I wanted to let Camilla and the new baby share a room because moving the office would be daunting and dark. 
But then, through the power of Pintrest, I found a computer armoire from Walmart that would store most of the office in the living room and open the dark bedroom up to possibilities. 


Then the problem became what to do with the pine paneling.  My favorite designer from HGTV is Sarah Richardson.  In one of her episodes, she remodeled her lake house, which was all pine paneling.  One of the bedrooms was in green and blue where she only painted two walls.

Inspiration room.......

So here is what I did - painted two walls, made curtains, and am now in the process of finding the artwork (or making the art work) for the walls.

Before...

Before...

After paint and curtains

After painting only two walls....and I think I like it.

An update from Winter Hibernation

What a fall and winter it has been!  I am still teaching three nights a week at the YMCA while also working full time, Steve is still in class two nights a week, I am still teaching the classes on Sundays at Williams-Sonoma, Camilla is in full force, oh  - and did I mention I am exhausted with my second pregnancy? 

The plan from last summer was to master The Suburban Challenge so that despite a crazy and hectic fall/winter schedule, our family would still be eating homemade/homegrown/healthy meals each night for dinner.  Mission accomplished!  I did this through freezing and canning over the summer prepared entrees that only needed browning of meat, cooking of pasta, or mixing into a 9x13 casserole dish. 

Here is a look at some of my winter staples from the garden last summer:
Okra and Tomatoes: I cook shrimp or sausage, add veggies and serve over rice
Provencal Chicken: I brown chicken breast, add veggies, and serve over couscous
Gumbo Starter: I make a roux, add veggies and meat and serve over rice
Chicken Pot Pit Starter: I add cream of chicken soup, cream of mushroom soup, and top with biscuits
White Chili Starter: Brown chicken and add soup starter.
(All of these recipes can be found on this blog.)

Dinner on the weeknights has become so much easier that I enjoy doing "special stuff" on the weekends - homemade pizzas, stews, roasts, etc....


This new organization has also allowed me to spend time sewing more after Camilla goes to bed. 
We have a very SPECIAL wedding to attend in April and we are ready with this pillowcase dress and blouse.


This was our "Christmas Card" dress.

And I have been appliqueing anything I can get my hands on to get ready for our new little man arriving in April.


What's Next:
Believe it or not - it is time to start thinking about the garden again.  If you live in Zone 4 "The Southeast: NC, SC, GA" per the Farmer's Almanac, it will be time to start plowing and preparing the ground during the third week of February. Steve has scheduled a man to come plow ours during that week. Then, by the first week of March the spring gardens need to go in: Broccoli, Brussels Sprouts, Kale, Lettuces, Peas, Carrots, Cauliflower, Cabbage, etc... 
And the fun will begin all over again!!  I just hope I can get the spring garden in and the rows prepared for the summer garden before the little man arrives.

Sunday, November 20, 2011

The Cake is BLUE!!

This fall has been so busy.  Aside from working my three jobs, I have also made it through my first trimester! Thank goodness for a freezer stocked full.  We have continued to eat healthy, and on a budget all fall despite only having two nights a week where I don't have other commitments. I'll have to utilize my break at Christmas to re-stock the freezer to get it ready for sleepless nights this spring.

We had our ultra-sound last week to learn the gender. My cousin Taylor gave us the idea of keeping it a secret until a later time for a "Gender Revealing Party." So, at the ultrasound, I asked the technician to turn the screen away, type the gender, print the pictures, and place them in a sealed envelope.  I was a very good girl all week and did not peak at that envelope.  This weekend, I prepared a layer cake and icing, took the layers and icing to my friend Cindy who behind closed doors opened the envelope, colored the middle layer to match, and then frosted the entire cake.  We had a party at my mom's house tonight (Sunday) where we cut into THE CAKE, and amongst close friends and family found out that the middle layer was BLUE!


The recipe I used came from http://www.marthastewart.com.  However, I made some changes so that it would be easier and less expensive. Here is what I did.

Ingredients
2 pounds of sweet potatoes (about 3)
1 1/4 cups vegetable oil
Grease for pans
2 cups all purpose flour
4 eggs
2 cups white sugar
2 teaspoons baking powder
1 teaspoon salt
1 tablespoon ground cinnamon
1 teaspoon ground nutmeg
2 teaspoons vanilla extract
1 pound white chocolate
2 cups heavy whipping cream

1. Heat oven to 400 degrees. Coat potatoes with 1/4 cup vegetable oil, and place on a baking sheet. Bake until tender, 30 to 40 minutes. When cool enough to handle, remove the skins, and puree the flesh in a food processor. (I was able to use Sweet Potatoes from our garden!)

2. Lower the oven temperature to 325 degrees. Grease two 8 inch cake pans, dust with flour, and set aside. In the bowl of an electric mixer fitted with the paddle attachment, beat eggs and sugar together on medium-high speed until light and fluffy, about 5 minutes. Add remaining 1 cup vegetable oil; beat on medium speed until well combined. Add the cooled sweet potatoes, and mix until combined.

3. Sift together flour, baking powder, salt, cinnamon, and nutmeg; mix into sweet potato mixture. Mix in vanilla.

4. Evenly distribute cake batter into prepared pans, and transfer to the oven. Bake until a toothpick comes out clean, about 40 to 45 minutes. Let pans cool on a wire rack 10 minutes. Invert cakes onto rack; cool completely, about 1 1/4 hours.

5. Meanwhile, chop the white chocolate into small pieces, and set aside. Bring 1 cup of cream to boil. Pour over chocolate. Whisk until chocolate is melted. Chill for 30 minutes.  (This was a hard step and I could not get all of my chocolate to smooth out so my icing ended up being a little chunky. If I were to do it again I would go with a traditional cream cheese frosting that is easier to make and spread.)

6. When chocolate mixture has cooled, pour remaining cup of cream into an electric mixer and whip on medium until soft peaks form, about 3 minutes. Fold whipped cream into chocolate mixture until fully incorporated.

7. Layer cakes with icing and cover.